


Getting a lead vocal to sit right is the hardest part of a mix for most producers. Here is a complete, radio-ready lead vocal chain for FL Studio, built entirely on stock plugins, that you can download free and drop onto a mixer track in seconds. Before you read a single setting, press play below and hear what it does.
That is the same dry vocal included in the free download, before and after. The preset is called Billboard Lead: a full stock-plugin chain across 10 mixer slots. No third-party plugins, no FabFilter, no Valhalla, no Auto-Tune license. Below, we break down every plugin, the key settings, and the reasoning behind the order, so you are not just using it, you are learning from it.
What You Are Getting
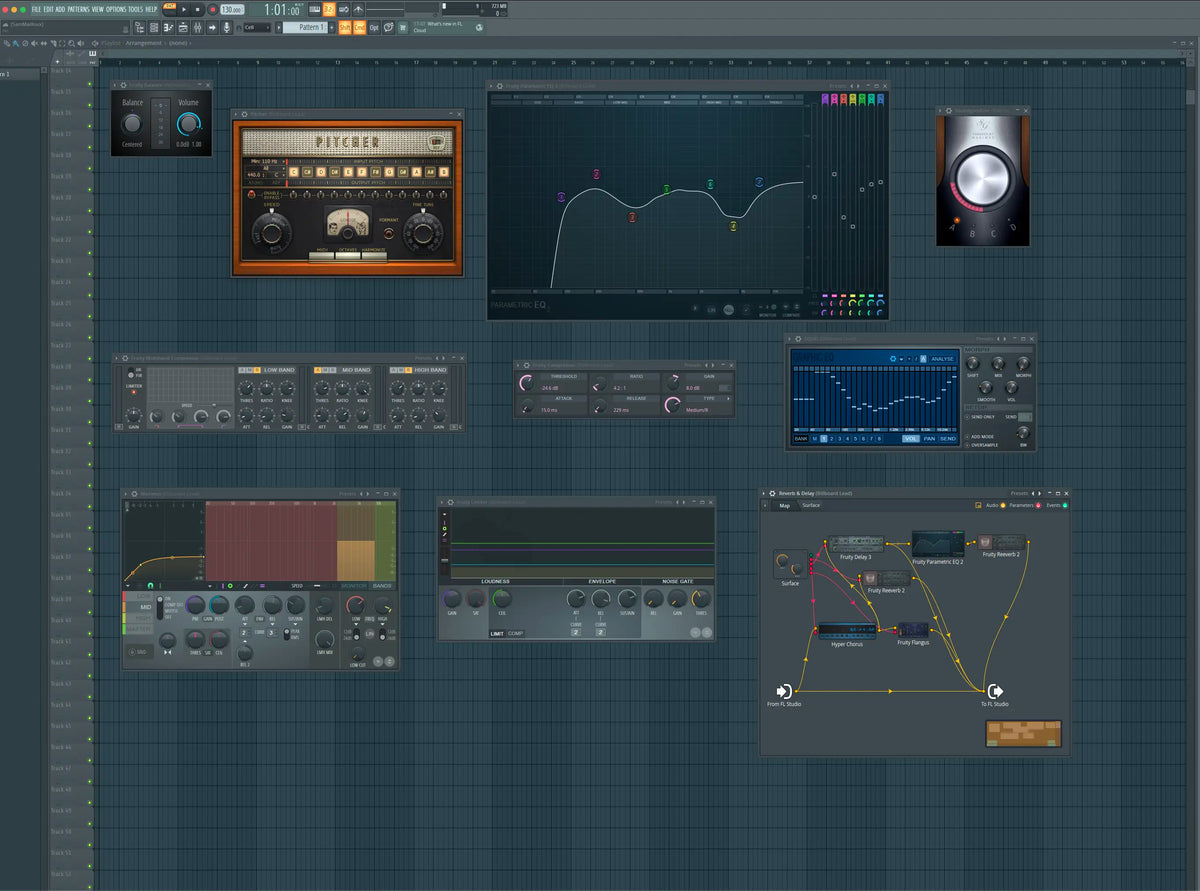
Billboard Lead is a modern Pop, R&B, and Hip-Hop lead chain. It takes a raw, dry take to a bright, upfront, radio-ready vocal. The full chain, in signal order: Fruity Balance, Pitcher, Fruity Parametric EQ 2, Soundgoodizer, Fruity Multiband Compressor, Fruity Compressor, EQUO, Maximus, Fruity Limiter, and a custom Reverb & Delay Patcher.

The whole thing saves as a single Mixer Track State file, so the entire 10-slot chain loads onto a mixer track in one click. And because we included a dry vocal in the download, you can drop the preset on and A/B the before and after immediately, with no need to find a test file.
Why the Order Matters More Than the Plugins
The reason this chain sounds finished instead of fighting itself is the order. The principle is simple: corrective work before creative work, dynamics before space. Get that wrong and the same plugins that should stack cleanly collapse into a muddy mess.
Put compression before a cleanup EQ, and the compressor reacts to low-end rumble and plosive bursts it was never meant to touch. You get unnatural pumping and inaccurate gain reduction, and the vocal sounds inconsistent no matter how much you chase the threshold.
Place reverb or delay too early, and every processor after it (EQ, compression, limiter) works on the dry vocal and the reverb tail at the same time. Clarity washes out and the vocal sounds distant instead of upfront.
So Billboard Lead moves through clear stages: clean and tune the signal, shape the tone, control the dynamics, fine-tune and de-ess, finalize the level, then add space. That four-stage mental model (clean and tune, shape, control, space) is not specific to this preset. It is a framework you can apply to any chain you build, on any voice, in any genre. Most free preset content lists plugin names and skips this reasoning entirely, and that reasoning is exactly what turns a preset into a skill you keep.
Stage 1: Prep the Signal
Fruity Balance
The chain opens with Fruity Balance, centered at unity gain. This is your input-staging slot, and it is almost never discussed in vocal tutorials, which is a big reason home-studio vocals sound inconsistent even with good plugins loaded. Use the volume knob to bring your raw vocal to a healthy level (peaking around -12 to -6 dBFS, no clipping) so it hits the rest of the chain consistently. Every plugin downstream works more accurately because of it.

Pitcher
Tuning comes first, on purpose, so every plugin after it works on an in-tune signal. Pitcher is FL Studio's native real-time pitch correction (its stock Auto-Tune equivalent, no extra license needed). It ships in C Minor as a placeholder, and this is the one setting you must change: set Pitcher to the key and scale of your song. The medium speed keeps the correction natural and musical rather than robotic. Slower is more transparent, faster gives you the obvious tuned effect popular in modern Hip-Hop and Pop.

Stage 2: Shape the Tone
Fruity Parametric EQ 2
The main tone-shaping move, a textbook modern-lead curve. This is the corrective pass, subtractive first, so the compressor later responds only to the vocal, not to low-end energy it should never have seen. Every band, exactly:
- Steep 95 Hz high-pass (8th order) to remove rumble and plosives.
- +4.5 dB at 206 Hz for chest and body.
- -4 dB at 456 Hz to pull out boxiness and mud.
- +1.5 dB at 972 Hz and +2.5 dB at 2,565 Hz for presence and intelligibility.
- -5.8 dB at 4,277 Hz to tame harshness.
- +3 dB high shelf at 7,571 Hz for air and sheen.
Clean, present, and open. (If you also use our free Logic Pro lead vocal preset, this curve will look familiar, it is the same target sound, rebuilt on FL Studio's stock EQ.)

Soundgoodizer
A one-knob multiband enhancer (powered by Maximus) on preset A, dialed in gently. It adds polish, density, and a touch of excitement, an instant finished sheen before the heavy dynamics do their work. Tip: right-click its title bar and choose Open in Maximus to see exactly what it is doing under the hood. It doubles as one of the best ways to actually learn multiband processing.

Stage 3: Control the Dynamics
Fruity Multiband Compressor
This controls dynamics per frequency band, low, mid, and high, independently. It keeps the low-end tight, the mids even, and the highs smooth, so no single part of the vocal jumps out or gets unruly. Think of it as spectral leveling that prepares the signal before the main compressor grabs it.

Fruity Compressor
The main broadband compressor: -24.6 dB threshold, 4.2:1 ratio, +8 dB makeup, 15 ms attack, 229 ms release, Medium/R. Running it after the multiband pass is what gives you surgical control, two lighter stages instead of one heavy compressor doing all the work. Fast enough to add punch and presence, this is what makes the vocal sit upfront and stay consistent from the quietest word to the loudest.

Stage 4: Fine-Tune and Tame
EQUO
A second, graphic EQ, used with its built-in analyzer. Where the Parametric EQ made the broad corrective moves early, EQUO is the creative pass late in the chain, once the dynamics are already under control. It lets you see the vocal's actual frequency content and sculpt it further, catching resonances and fine-tuning the balance more surgically than a few parametric bands can. Two EQs at two different stages, each doing a different job, is the difference between a good tone and a dialed-in one.

Maximus (as a de-esser)
Maximus is set up here as a de-esser. It uses its multiband engine to clamp down on the sibilant high band, taming the harsh ess and tss sounds that the presence and air boosts naturally accentuate. It sits right after the brightening, exactly where sibilance needs to be caught. Every voice sibilates at a slightly different spot in the 3 to 8 kHz range, so if you want to tune it to your own vocal, sweep that band while the take plays, find the harshest frequency, and set it there.

Stage 5: Finish
Fruity Limiter
Final peak control plus a touch of saturation, and it belongs at the very end, after all the processing, so it is catching a finished signal rather than an unfinished one. It tames the loudest peaks so the vocal stays consistent and hot in the mix, and the saturation adds subtle harmonic richness and glue. No gate is used here, so every breath and tail stays intact.

Stage 6: Space and Width
Reverb & Delay (custom Patcher)
This is the slickest part of the preset, and it lives at the very end so the reverb and delay tails are never processed by the EQ, compressor, or limiter above them. It is a custom Patcher that passes your dry vocal straight through while routing Reverb, Delay, Hyper Chorus, and Flanger onto their own parallel signals, exactly like sending them to separate effect buses, but built right into the preset. It even includes a simple Surface with four knobs (Reverb, Delay, Hyper Chorus, Flanger) so you can dial each effect's level to taste without ever opening the routing.
This is the pro move most producers set up by hand, running your time-based effects on their own buses so they add width and depth without ever muddying the dry vocal, done for you, bundled into one portable slot, and made adjustable with four knobs. Turn the Reverb and Delay up in the chorus, back down in the verse, and the vocal breathes with the song.


How to Install the Preset in FL Studio
- Download the free preset and unzip it.
- In FL Studio, select the mixer track you want your vocal on.
- Click the small arrow at the top-left of that mixer track (the preset menu), choose Open mixer track state file, and select Billboard Lead. The whole chain loads onto the track at once.
- Route your vocal channel to that mixer track, and you are ready.
That is it. Drop it on, play your vocal, and adjust to taste.
Getting the Best Out of It
- Set Pitcher to your song's key and scale first. This is the one must-do, it ships in C Minor as a placeholder.
- Set the Fruity Balance volume so your vocal hits the chain at a healthy level.
- Use the Reverb & Delay Surface knobs to shape space per section, more in the chorus, less in the verse.
- Darker or brighter mics: nudge the +3 dB air shelf in Parametric EQ 2 up for dull mics, or pull the Soundgoodizer knob back a touch for already-bright ones.
- Everything ships on and dialed in. It is a strong starting point, not a locked box, so experiment with the EQs, the compressors, the multiband, and the de-esser to fit your vocal.
Want the Full Collection?
Billboard Lead is one chain. The Infinity Suite for FL Studio includes 130+ vocal chains plus 7,000+ total assets across mixing, mastering, and sound design, all built on FL Studio's stock plugins, for a one-time price with no subscription. Every chain is pulled from the same personal workflow, backed by 11+ years of active independent production, sync placements, and festival performances. If this free preset saved you time, the full suite is the next step.
FAQ
Is this preset really free? Yes, and it includes a dry vocal so you can test it instantly.
Do I need any third-party plugins? No. Every plugin in the chain is an FL Studio stock plugin.
What FL Studio edition do I need? The FL Studio Signature Bundle (or All Plugins Edition). Everything in the chain, Maximus, EQUO, Hyper Chorus, Flangus, and all the Fruity effects, runs on Producer Edition, but Pitcher (the auto-tune) is only in the Signature Bundle and up. So Signature is the minimum that runs the full preset.
What genre is it for? It is dialed for modern Pop, R&B, and Hip-Hop lead vocals, but it works as a strong starting point on most lead vocals.
What do I have to change? Just set Pitcher to your song's key and scale. Everything else is ready to go.


